Web Development with
Python & Django: Part V
Deploying Django Applications
Announcements
- Assignment #6 is due tomorrow (April 27th)
- Next up: machine learning!
Deploying Django Applications
- We've learned how to build a Django-based site
- But how do we make it available on the world-wide web?
- There are lots of ways...
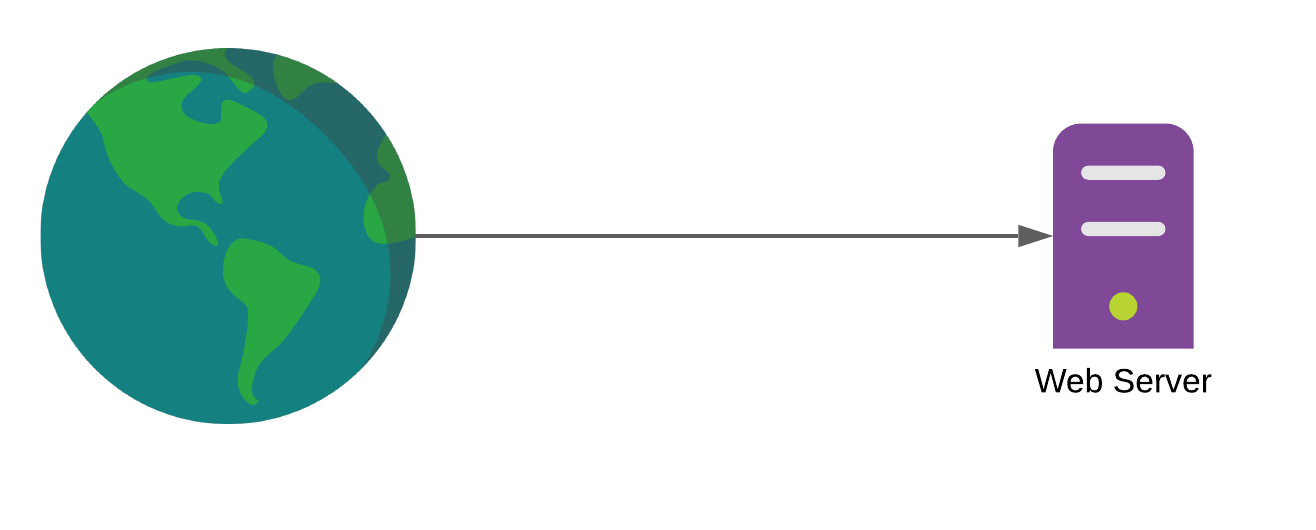
1-100k daily requests
What do we mean by server?
- A physical machine
- A virtual machine
- A container

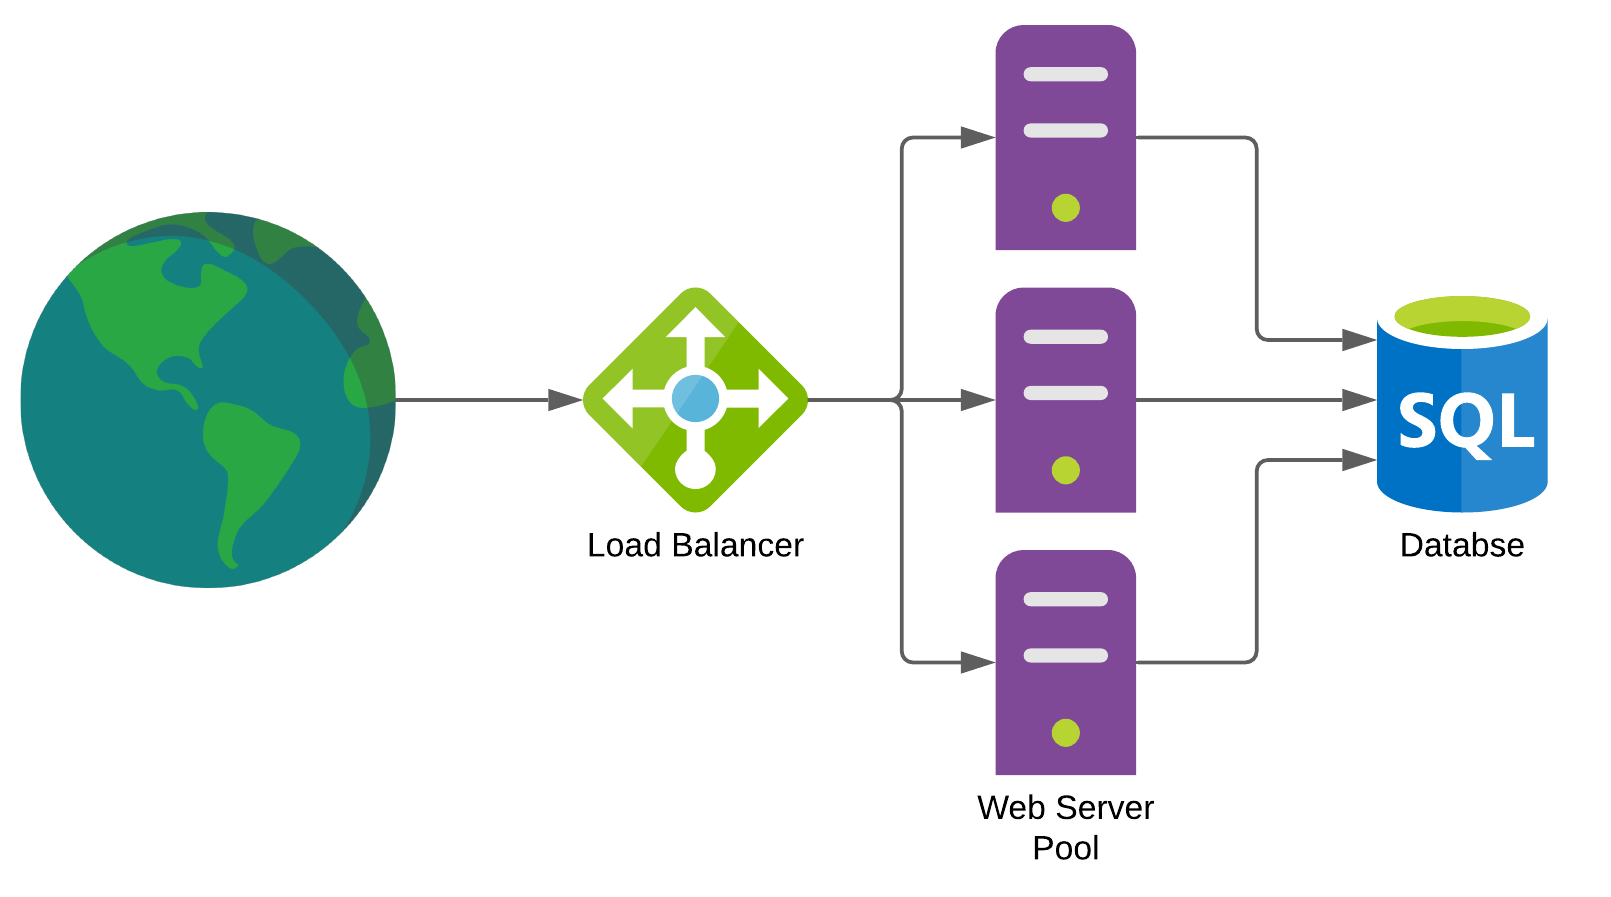
100k-1 million daily requests
1-100 million daily requests
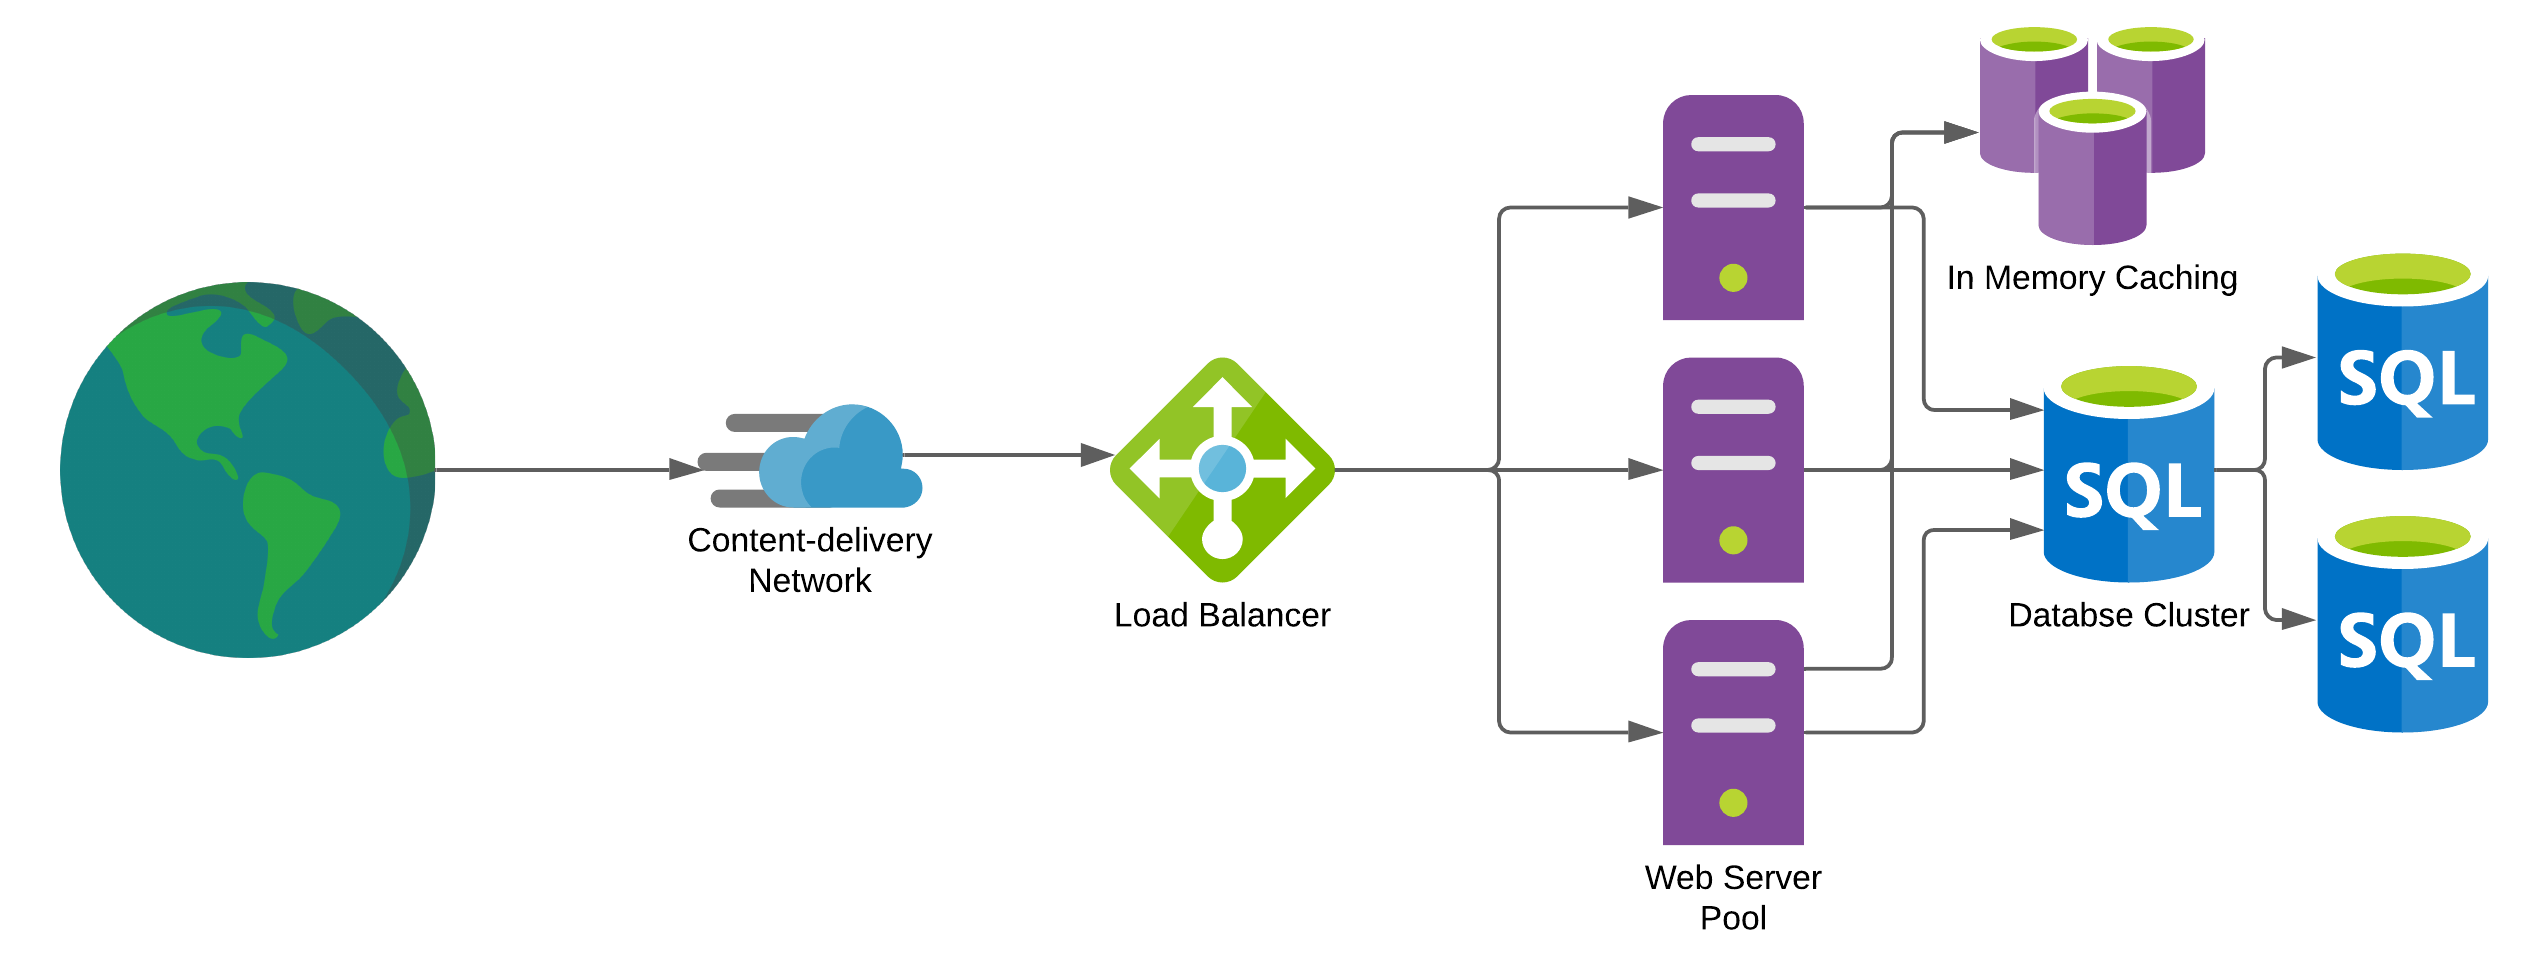
1 billion daily requests
Administering a webserver takes know-how
- Configuring networking and security
- Installing and running a webserver
- Installing and running a database
- Applying security updates to the OS
Is there a viable alternative to having to learn all this?
Platform as a service (PaaS)
- A cloud-based provider
- the consumer controls software deployment with minimal configuration options
- multi-tenant
- applications are hosted within containers
| 👍🏻 | ☹️ | |
|---|---|---|
| setup: | requires little expertise | lack fine-grained control of infrastructure |
| support: | ongoing maintenance is handled for you | |
| cost: | can be quite expensive |
- One of the earliest PaaS providers
- Supports Python...
- ...and Ruby, Go, Java, PHP, and more
- Has a free tier
| Tier | Cost | What you get |
|---|---|---|
| Hobby | $7/month | SSL |
| Standard | $25-50/month | More RAM |
Alternatives:
Terminology
- App: a web application (in this case a Django project)
- Dyno: a container that runs a web application (like a Django app)
Using Heroku
- Create an account and confirm your email
- Install the Heroku command-line interface (CLI)
- run
heroku login - Create a
Procfilein the root of your Github repository
The Procfile
- Heroku apps include a Procfile that specifies the commands that are executed by Heroku on startup...
- ...for example starting a Django webserver
- The Procfile is always a simple text file that is named
Procfile(no file extension) - The Procfile must live in your GitHub project's root directory. It does not function if placed anywhere else.
- Here's an example Procfile from our in-class project
Example Procfile
release: python manage.py migrate
web: gunicorn cheeseshop.wsgi --log-file -
Using Heroku (continued)
- Add a few libraries to
requirements.txt:Django~=4.0 # Easily configure a DB in Heroku: dj-database-url~=0.5 # Webserver for WSGI apps gunicorn~=20.1 # Database driver for PostgreSQL psycopg2~=2.9 - Add a
runtime.txtto project root, specifying Python version to use:python-3.10.4 - Adjust your
settings.pyfile a bit. (more soon...) - Commit everything to your Git repo.
- Create an app on Heroku, which prepares Heroku to receive your source code. You can do this on the Heroku site:
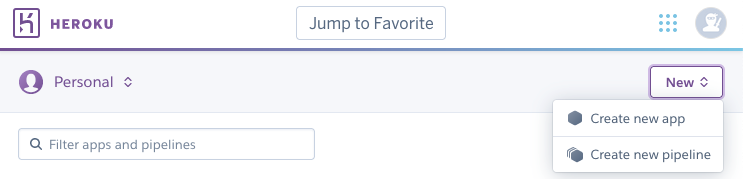
- You need to create a
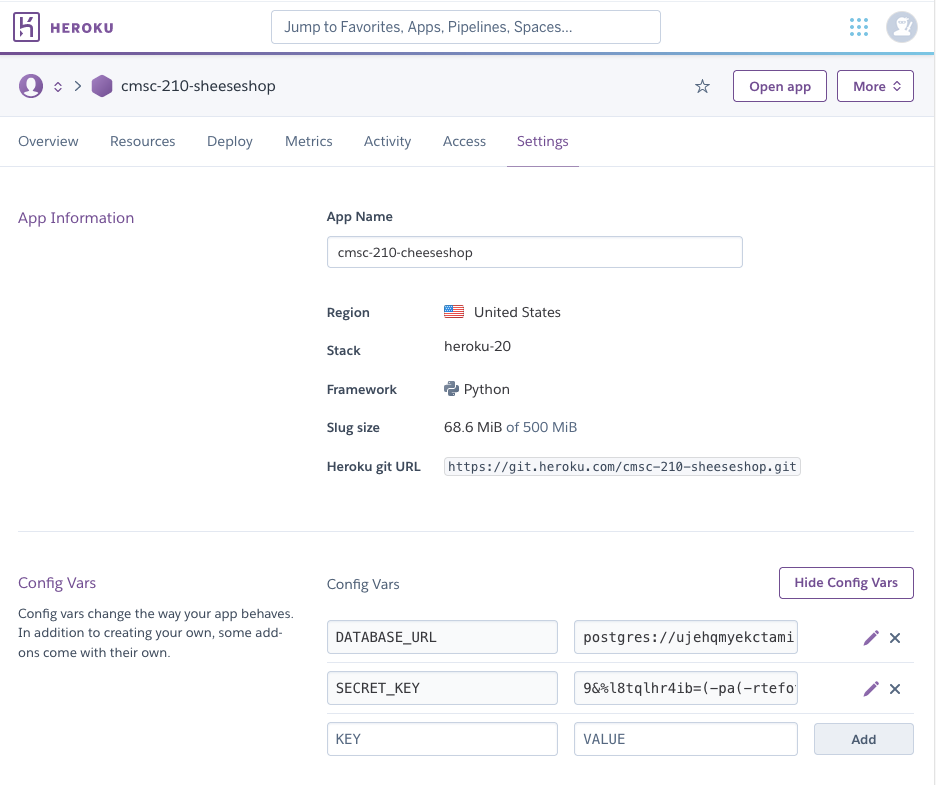
SECRET_KEYfor your app:
You can do this on the command-line with the heroku app:
heroku config:set SECRET_KEY="9&%l8tqlhr4ibpq86#gcq_wxtr8272fd"
Any settings that you don't want to store in version control (like passwords) or that you want to vary by environment can be specified this way
You can also set these through the Heroku website
Heroku uses Git to get your app from your local machine up to Heroku's servers.
- When you create an app, you should add Heroku as an additional git remote:
$> heroku git:remote -a cmsc-210-cheeseshop - To deploy your app, you just push to a remote git repo:
$> git push heroku main
About that settings.py file...
$> heroku run python manage.py createsuperuser
Useful for creating an admin user in our database so we can sign in.
$> heroku logs
Adding a real database
$> heroku addons

Add-on                                           Plan       Price  State
───────────────────────────────────────────────  ─────────  ─────  ───────
heroku-postgresql (postgresql-corrugated-17723)  hobby-dev  free   created
 └─ as DATABASE
Let's find out about our database
$> heroku config
=== cmsc-210-cheese-shop Config Vars
DATABASE_URL: postgres://**********:b4c39d26b9f48a5b989c7efe46bb677f7cc7b1a50affab89b5c26529d7c87602@ec2-3-216-89-250.compute-1.amazonaws.com:5432/d94mllmcnmq0lu
SECRET_KEY:   9&%l8tqlhr4ibpq86#gcq_wxtr8572fdHJI
You can also try running:
$> heroku pg
What do we know so far?
- We have a hobby database (free)
- It is running Postgres 10.5, with no data.
- A connection URL is already setup in the config store
Now we need to adjust our settings to use this database.