Web Development with
Python & Django II
Creating a simple app
Announcements
Assignment 5 is due tomorrow.
Quick recap of key Django Concepts
- Project: a single web application (often project = website)
- App: a single unit of functionality (one project can contain multiple apps). Apps should do one thing and do it well.
- Router: code that maps URLs to views that handle them
- View: function (or class) that receives an HTTP request as its argument and returns an HTTP response
- Model: a python class that maps to a database table
What happens when you do this?
$> pip install Django
- The Django package is installed in your environment:
import django django.VERSION # gives you 4.0.4 - A command-line executable called
django-adminis installed in your environment.
It's Django’s command-line utility for administrative tasks. It can:
- Create a new project
- Create a new application in the project
- Manage your database
- Run a development webserver
- & lots more!

- I am really into cheese.
- I painstakingly maintain a database of cheeses.
- I would like to share my encyclopedic knowledge of cheeses and cheese-related information with the world.
- I would like to solicit the thoughts and opinions of others regarding various cheeses.
Let's create a new project so that users can browse this painstakingly curated collection of information about cheeses and rate cheeses they have tried.
$> django-admin startproject cheeseshop
Run this command in the directory where you want to create your Django project.
Generally it's a good idea to run it in the root directory of a Github project you want to keep your site in.
What did startproject do?
        cheeseshop/
            manage.py
            cheeseshop/
                __init__.py
                settings.py
                urls.py
                asgi.py
                wsgi.py
It created some files.
What is manage.py for?
        cheeseshop/
            manage.py
            cheeseshop/
                __init__.py
                settings.py
                urls.py
                asgi.py
                wsgi.py
- Think of if as being a clone of
django-admin; it does all the same things but specific to your project. - Once you create a new project, you can generally stop using
django-adminand start usingmanage.pyto do things. - You should basically never need edit
manage.py.
Let's use this utility to start up a Django webserver:
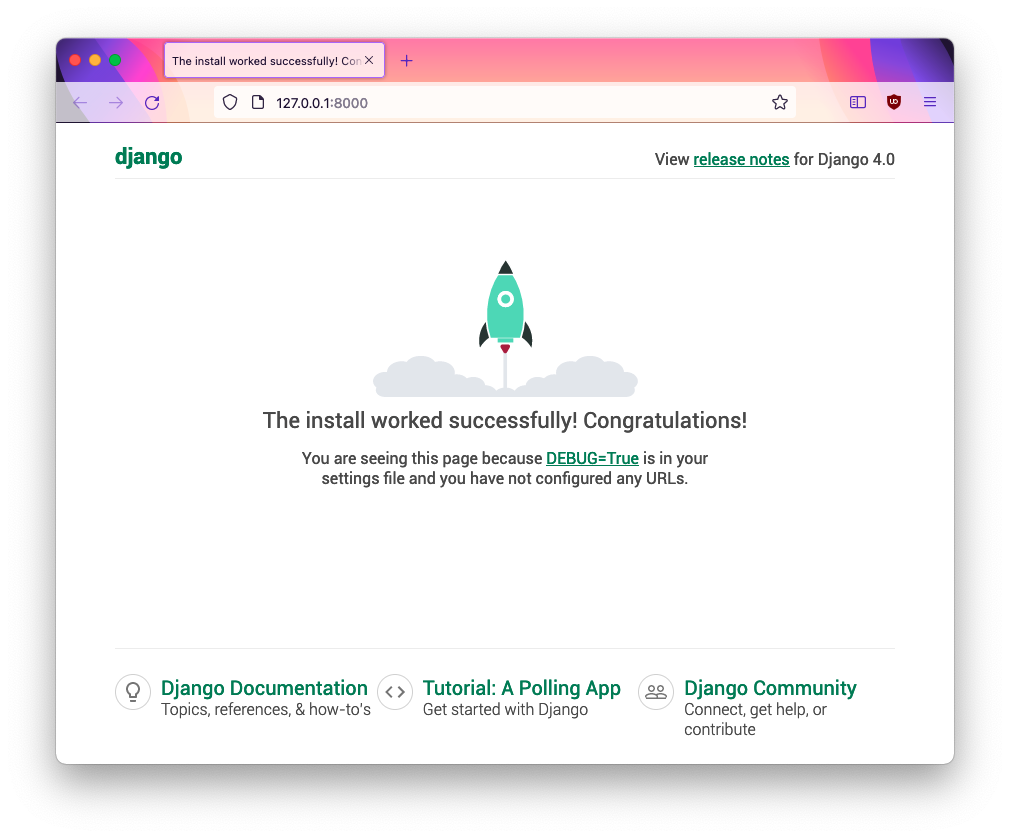
$> python manage.py runserver
This will start up a small, simple webserver you can use for local development. You can visit your website at http://127.0.0.1:8000/
What is 127.0.0.1, aka localhost?
- It's a special IP or hostname that always points at your own computer.
- You can use it to access web services that are running on your own computer.
- You don't even need an internet connection
- Django's built-in server will automatically run this on port 8000
- The standard HTTP port is 80 or 443
- http://www.google.com:80 👈🏻implied, don't need
- https://www.google.com:443 👈🏻implied, don't need
- http://localhost:8000 👈🏻non-standard, must specify
Let's look at our files again:
        cheeseshop/
            manage.py
            db.sqlite3
            cheeseshop/
                __init__.py
                settings.py
                urls.py
                asgi.py
                wsgi.py
Wait, where did this db.sqlite3 come from? It wasn't there before.
- This is our database.
- When we started our webserver, Django created it for us.
- By default, Django uses a very small simple database program called SQLite
- It comes bundled with Python
- It stores everything in one file.
What is settings.py for?
        cheeseshop/
            manage.py
            db.sqlite3
            cheeseshop/
                __init__.py
                settings.py
                urls.py
                asgi.py
                wsgi.py
- Settings/configuration for this Django project
- What apps are there?
- Where is the database?
- Where are certain kinds of files located?
- And much more.
What is urls.py for?
        cheeseshop/
            manage.py
            db.sqlite3
            cheeseshop/
                __init__.py
                settings.py
                urls.py
                asgi.py
                wsgi.py
- This is how we route URLs or groups of URLs to views.
- Django calls this the URL dispatcher
What about asgi.py and wsgi.py?
        cheeseshop/
            manage.py
            db.sqlite3
            cheeseshop/
                __init__.py
                settings.py
                urls.py
                asgi.py
                wsgi.py
- An entry-point for ASGI-compatible web servers to serve your project. We wont' be using this.
- An entry-point for WSGI-compatible web servers to serve your project.
- You should rarely, if ever, need to edit these.
What is WSGI? 
WSGI stands for Web Server Gateway Interface. It is a specification that describes how a web server communicates with Python web applications.
So far we've used the Django development web server, but if you were to deploy your app in production, you would use a real server.
This server would communicate without our Django app via WSGI, and use the wsgi.py file to do it.
Let's create a view to replace the default Django one.
- This will be the view for the main site landing page
- We want the root or index URL—"/"—to route to this view
- We haven't created an app yet. For now we'll just create a view in the project itself:
        cheeseshop/
            manage.py
            db.sqlite3
            cheeseshop/
                __init__.py
                settings.py
                urls.py
                asgi.py
                wsgi.py
                views.py
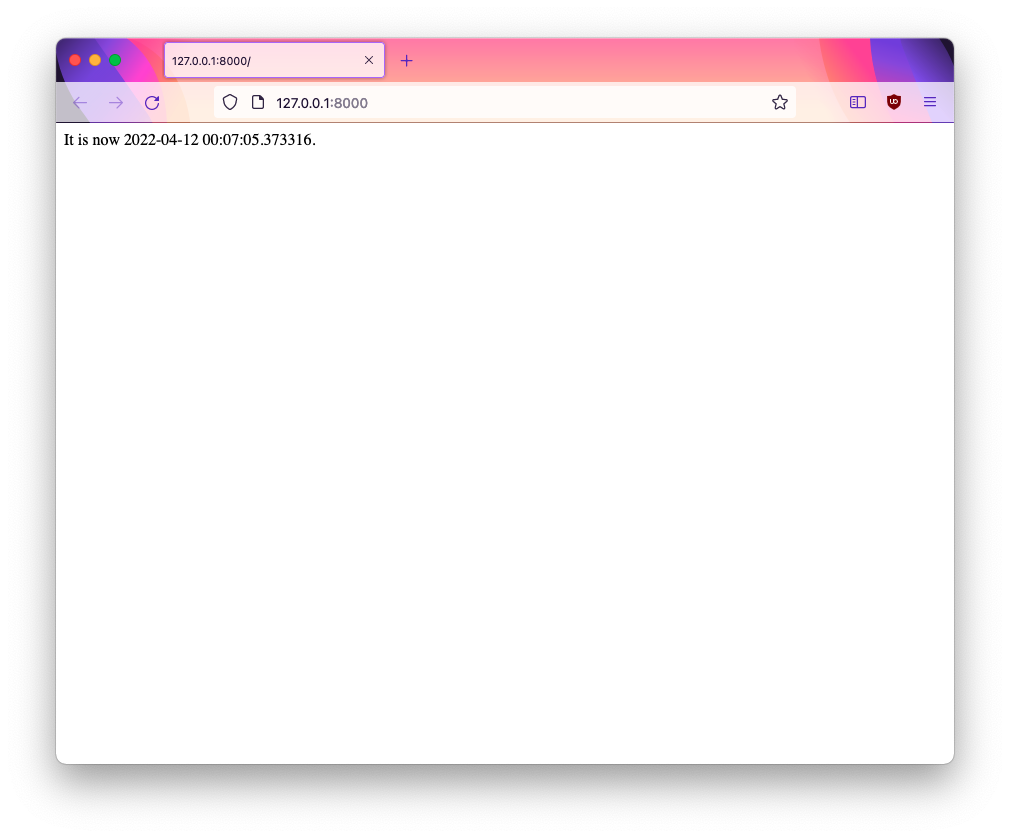
cheeseshop/views.py
from datetime import datetime
from django.http import HttpResponse


def index(request):
    now = datetime.now()
    return HttpResponse(f"It is now {now}.")
cheeseshop/urls.py
from django.contrib import admin
from django.urls import path

from cheeseshop.views import index

urlpatterns = [
    path("", index),
]
Note that we didn't have to do anything ohter than go to our browser and reload the page.
The Django webserver restarts whenever it sees your Python code has changed.
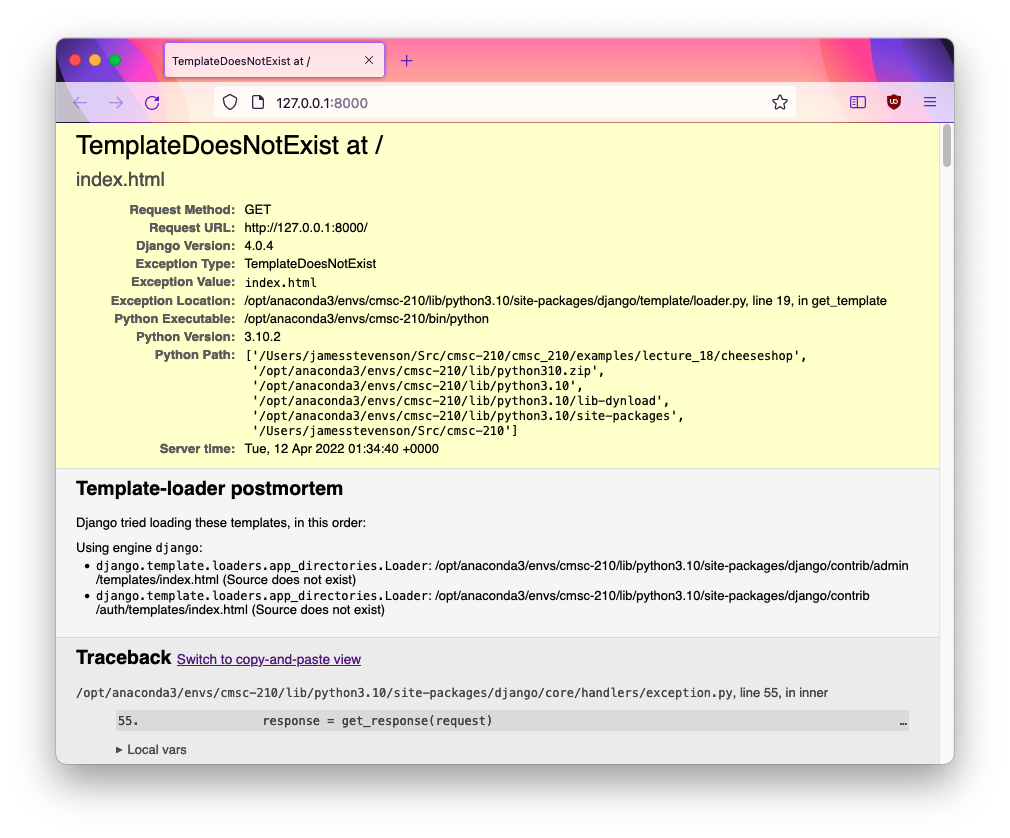
This is pretty boring. Can we spice it up a bit? Maybe add some HTML?
Create a folder in the Django project root called "templates".
- The name can be anything, but "templates" is standard.
- Create a file called
index.htmlinside that.
        cheeseshop/
            manage.py
            db.sqlite3
            cheeseshop/
                __init__.py
                settings.py
                urls.py
                asgi.py
                wsgi.py
                views.py
            templates/
                index.html
cheeseshop/views.py
from datetime import datetime

from django.shortcuts import render


def index(request):
    now = datetime.now()
    return render(request, "index.html", {"now": now})
Templates are rendered with a context.
A context is a list of variables that will be available in a template. It's represented as a dictionary where the keys are the variable names and the values are the variable values.
{
    "date": datetime.now(),
    "name": "Bob Smith",
    "age": 28
}
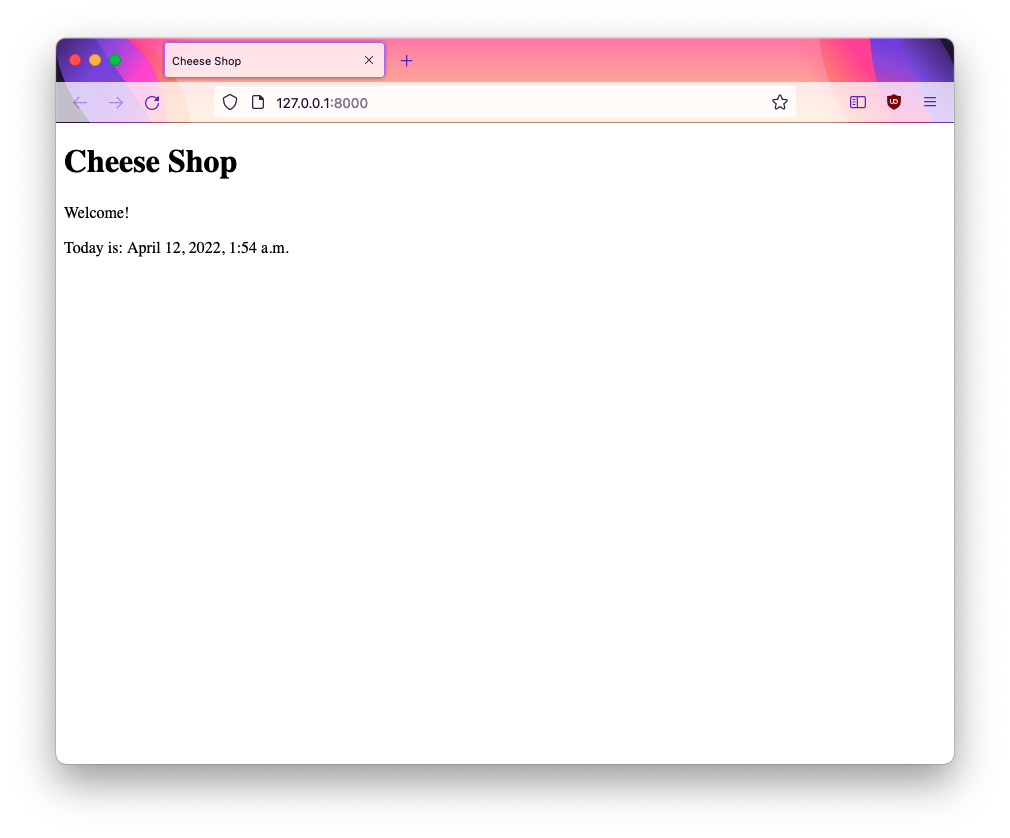
<!DOCTYPE html>
<html lang="en">
<head>
    <meta charset="UTF-8">
    <title>Cheese Shop</title>
</head>
<body>
    <h1>Cheese Shop</h1>
    <p>Welcome!</p>
    <p>Today is: {{ now }} </p>
</body>
</html>
So far we've...
- Defined a view in
cheeseshop/views.py - Defined a URL route in
cheeseshop/urls.py - Defined a template in
templates/index.html

Explicit is better than implicit.
We forgot a step
- Defined a view in
cheeseshop/views.py - Defined a URL route in
cheeseshop/urls.py - Defined a template in
templates/index.html - Tell Django where to look for templates.
cheeseshop/settings.py (partial)
TEMPLATES = [
  {
    'BACKEND': 'django.template.backends.django.DjangoTemplates',
    'DIRS': [],
    'APP_DIRS': True,
    'OPTIONS': {
      'context_processors': [
         'django.template.context_processors.debug',
         'django.template.context_processors.request',
         'django.contrib.auth.context_processors.auth',
         'django.contrib.messages.context_processors.messages',
      ],
    },
  },
]
cheeseshop/settings.py (partial)
TEMPLATES = [
  {
    'BACKEND': 'django.template.backends.django.DjangoTemplates',
    'DIRS': ['templates'],
    'APP_DIRS': True,
    'OPTIONS': {
      'context_processors': [
         'django.template.context_processors.debug',
         'django.template.context_processors.request',
         'django.contrib.auth.context_processors.auth',
         'django.contrib.messages.context_processors.messages',
      ],
    },
  },
]